- Important information
- New features
- Known problems
- Program corrections
- User guide corrections
- Miscellaneous
- Release history
Important information
J-Link Ultra can be calibrated to ensure accurate power measurements. To calibrate J-Link Ultra follow these steps:
- Make sure the J-Link Ultra JTAG connector is disconnected from the target board
- Connect J-Link Ultra to the PC
- Start J-Link Commander (
Program Files\IAR Systems\Embedded Workbench 5.4\arm\bin\jlink.exe) - Type "calibrate"
The J-Link/J-Trace probe has a built-in flash programming capability for some devices. This capability might in some cases conflict with the flash loader mechanism provided by the debugger. For example when disabling the debugger flash loader with the intent of debugging directly in RAM, the J-Link/J-Trace built-in flash loader might still be active causing unexpected results. The J-Link/J-Trace built-in flash loader can be enabled/disabled using the J-Link control panel accessible from the Windows task bar when the Embedded Workbench is in debug mode.
To J-Link DCC file names have changed in version 5.20. Use
JLINKDCC_Process.c, JLINKDCC.h, JLINKDCC_HandleDataAbort.sinstead ofDCC_Process.c, DCC_Process.h, and DCC_HandleDataAbort.s.To debug with J-Link, the USB driver has to be installed. The driver is found in the
drivers\JLinkdirectory on the installation CD-ROM. In addition, it is available in the...\arm\drivers\JLinkdirectory in the installation.For more information on installing J-Link, refer to the IAR Embedded Workbench Debugging Guide and the J-Link / J-Trace User Guide.
New features
Known Problems
Program Corrections
User guide corrections
Miscellaneous
-
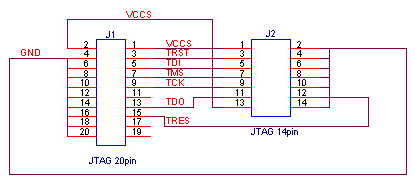
J-Link is shipped with a 20-pin JTAG connector. 14-pin JTAG targets can
be connected with a cable as shown below:
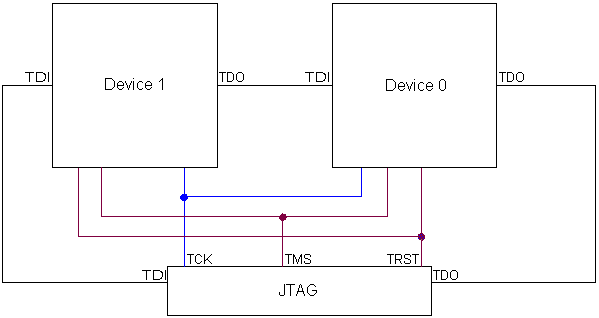
Debugging multiple ARM cores
J-Link can handle multicore debugging. In this case multiple ARM devices are connected to the same JTAG connector as shown below: