Creating and using libraries
This tutorial demonstrates how to create a library project and how to combine it with an application project.
Note that the screenshots in this tutorial do not always correspond exactly to the counterparts in your product.
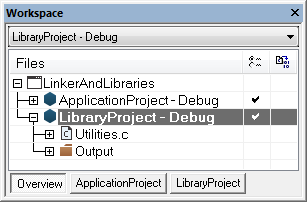
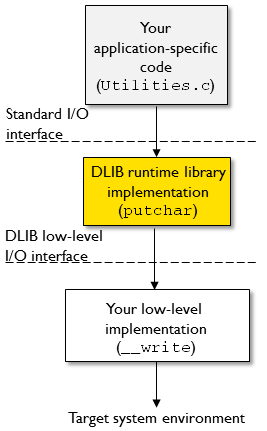
This tutorial assumes that you are familiar with basic use of IAR Embedded Workbench®; see the tutorial Getting Started using IAR Embedded Workbench.
Tutorial overview
Tutorial description
If you are working on a large project, you will soon accumulate a collection of useful modules that contain one or more functions to be used by several of your applications. To avoid having to assemble or compile a module each time it is needed, you can store such modules as object files, in other words, assembled or compiled but not linked.
You can collect multiple modules in a single object file which then is referred to as a library, for example to create collections of related functions.
This tutorial demonstrates how you can set up a library project and based on that, build a library using the library builder. You will then add your library project to an application project.
The tutorial also demonstrates how you can override C/C++ standard library routines with your own variants.
Files used in this tutorial
The project in this tutorial uses these files:
*
Contains a simple application that uses only standard features of the C language. It initializes an array with the ten first Fibonacci numbers and prints the result to stdout.
*
Contains required definitions and declarations.
*
Contains functions required by Fibonacci.c for the Fibonacci calculations. The routines will be compiled to a separate library.
*
Contains required definitions and declarations.
*
Contains a modified version of the low-level function __write which is available in the runtime library. In addition to printing to stdout, the modified version also adds an * (asterisk) character in front of each printed Fibonacci number. Note that this file is a modified copy of the corresponding runtime library function.
Opening the tutorial project
1
2
Click the Product explorer symbol.
3
Under the Linker and libraries heading, click Open tutorial workspace. Choose a destination for your project in the browse dialog box that appears. We recommend that you create a specific directory (with a subdirectory) where you store all your tutorial files, if you have not done that already. In this tutorial we call the directory MyTutorials and the subdirectory LinkerAndLibraries. The LinkerAndLibraries workspace is opened in the IDE, and contains the project ApplicationProject.
Using libraries
In this example procedure, you will work through these steps:
*
*
*
Creating a library project
In this example procedure you will create a library project and compile your library.
1
Choose Project>Create New Project. In the dialog box, specify your tool chain and an empty project. Click OK.
2
In the Save As dialog box, save your project with the name LibraryProject in your LinkerAndLibraries directory.
3
Add the file Utilities.c to the project.
The LinkerAndLibraries workspace now contains two separate projects, ApplicationProject and LibraryProject.
At the bottom of the Workspace window, there are tabs where you can select to display the single projects or get an overview of the whole workspace. Make sure to click the Overview tab.
4
In the Workspace window, right-click LibraryProject – Debug and choose Options from the context menu.
In the General Options category, verify these settings:
 
A runtime library that suits your project settings is automatically chosen. Each runtime library has a specific library configuration; for this tutorial, the Normal configuration is suitable, which implies C locale, but no locale interface, no file descriptor support, and no multibyte characters in printf and scanf. The less functionality you need in the runtime environment, the smaller the environment becomes. For more information about the runtime environment and how it can be configured, see the compiler documentation.
Note that Library Builder appears in the list of categories, which means that a library builder is added to the build toolchain. However, for this tutorial you do not have to set any specific options for the library builder.
Click OK.
5
Choose Project>Make.
The library output file LibraryProject.a (or LibraryProject.rxx depending on your product, and where xx is a numeric part that reflects the product you are using) has now been created in the MyTutorial\LinkerAndLibraries\Debug\Exe directory.
Using the library in your application project
In this example procedure you will add your library object file to the project ApplicationProject.
1
In the Workspace window, right-click ApplicationProject — Debug and choose Set as Active from the context menu.
2
Choose Project>Add Files. By default, library object files are not visible, which means that you must use the file filter drop down list at the right bottom corner in the dialog box and choose Library/Object Files:
Add the file LibraryProject.a (or LibraryProject.rxx) located in the MyTutorials\LinkerAndLibraries\Debug\Exe directory. Click Open.
3
Click the Make button () to build your project.
4
Overriding a library module—retargeting
If required, you can override a library module with one that you have created yourself. This example procedure demonstrates how to do this.
Before you can run your application on a stand-alone target system, you must typically adapt some parts of the runtime environment, for example the system initialization or if your application uses the DLIB low-level I/O interface.
Utilities.c uses the standard I/O interface because it calls the library function putchar. The standard I/O interface is large and complex, and for this reason, the DLIB runtime environment is designed so that it performs all I/O operations through a small set of simple functions, which are referred to as the DLIB low-level I/O interface. In other words, the library function putchar calls the low-level function _ _write, which means that you do not have to modify putchar.
By default, the functions in the low-level interface have no usable implementations. To make the standard I/O interface work, you can:
*
*
Retarget the standard I/O interface to your target system by providing a suitable implementation of the interface.
In this example procedure you will work through the process of retargeting by overriding the low-level function __write with a modified version.
Note:  
The actual changes you must normally do to make the function work on your stand-alone target system are not covered in this tutorial.
Before you start this procedure, if needed copy the file write.c from the tutorials directory in your product installation to your MyTutorials\LinkerAndLibraries directory. This file contains a modified version of the __write function.
1
Add write.c to the project ApplicationProject like any other source file.
2
Click the Make button () to build your project.
Note that your version of __write is now used instead of the counterpart in the runtime library because your version is a program module and not a library module (program modules have precedence over library modules). For more information, see the linker documentation which you can find on the Help menu.
3
Start C-SPY and open the Terminal I/O window.
4
Click Go () to start the execution.
5
In the Terminal I/O window you can now see that your modified version of write.c is used. There is an asterisk printed before each digit.
See the compiler documentation for more information about the DLIB low-level I/O interface.