Mixing C and assembler modules
In some applications it might be necessary to write certain pieces of source code in assembler language.
This tutorial demonstrates how the compiler can be helpful in examining the calling convention, which you must be familiar with when calling assembler modules from C modules or vice versa. Furthermore, this tutorial demonstrates how you can easily combine source modules written in C with assembler modules.
Note that the screenshots in this tutorial do not always correspond exactly to the counterparts in your product.
This tutorial assumes that you are familiar with basic use of IAR Embedded Workbench; see the tutorial Getting Started using IAR Embedded Workbench.
Tutorial overview
Files used in this tutorial
The project in this tutorial uses these files:
*
Contains a simple application that uses only standard features of the C language. It initializes an array with the ten first Fibonacci numbers and prints the result to stdout.
*
Contains required definitions and declarations.
*
Contains utility routines required by Fibonacci.c for the Fibonacci calculations.
*
Utilities.s (or Utilities.sxx if you are using a product that uses the XLINK linker, and where xx is a numeric part that reflects the product you are using).
The same as Utilities.c, but using the assembler language.
*
Contains required definitions and declarations.
Opening the tutorial files
1
2
Click the Product explorer symbol.
3
Under the Language support heading, click Open the tutorial workspace. Choose a destination for your project in the browse dialog box that appears.We recommend that you create a specific directory (with a subdirectory) where you store all your tutorial files, if you have not done that already. In this tutorial we call the directory MyTutorials and the subdirectory LanguageSupport.
After you have chosen a destination directory, the LanguageSupport workspace is opened in the IDE.
4
In the Workspace window, select the MixingCandAsm project, right-click and choose Set as Active.
Mixing C and assembler modules
In this example procedure, you will work through these steps:
*
*
*
Examining the calling convention
When you write an assembler routine which is called from a C routine, you must be aware of the calling convention that the compiler uses. If you create skeleton code in C and let the compiler produce an assembler output file from it, you can study the produced file and find the details of the calling convention.
In this example procedure, you will set up the compiler to create an assembler output file from the file Utilities.c.
1
In the Workspace window, select the file Utilities.c, right-click, and choose Options from the context menu.
2
Select the C/C++ Compiler category and then select Override inherited settings.
3
 
Note:  
In this example you must use a low optimization level when you compile the project, to show accesses to local and global variables. If you use a higher level of optimization, the references to local variables might be removed. However, the actual calling convention used is not affected by the optimization level.
On project level, the settings used in the predefined tutorial project should be used as is.
4
Click OK and return to the Workspace window.
5
Compile the file Utilities.c.
6
You can now find the file Utilities.s (or Utilities.sxx, depending on your product) in the Output folder. Open the file to examine the calling convention and to see how the C code is represented in assembler language.
You can see where and how parameters and the return value are passed, and how to return to the program location from where a function was called. You can also see which registers an assembler-level routine must preserve.
To obtain the correct assembler interface for your own application functions, you should create skeleton code for each function that you need.
For more information about the calling convention used in the compiler, see the C/C++ Development Guide (or C/C++ Compiler User Guide, depending on your product).
Adding assembler modules to the project
This example procedure demonstrates how you can create a project that contains both assembler modules and C modules.
1
In the Workspace window, update the MixingCandAsm project by adding the file Utilities.s (or Utilities.sxx, depending on your product) that you just created. In the Output folder, select the file, right-click and choose Open Containing Folder from the context menu. In the browse window that appears, select the file and drag it to the Workspace window, or more specifically, to the project where you want to add the file.
2
To exclude the file Utilities.c from the build (which is no longer needed), select the file in the Workspace window, right-click and choose Options from the context menu. In the Options dialog box, select Exclude from build.
When you have finished making your settings, click OK.
3
In the Workspace window, select MixingCandAsm - Debug, right-click, and choose Options from the context menu. Use the default settings in the General Options, C/C++ Compiler, and Linker categories. Select the Assembler category, click the List tab, and make sure the option Output list file is selected.
When you have finished making your settings, click OK.
4
In the Workspace window, select MixingCandAsm - Debug, right-click, and choose Rebuild All from the context menu. The project is built with the assembler file instead of with the corresponding C file.
5
To open the list file, double-click the file Utilities.lst available in the Output folder in the Workspace window.
The end of the file contains a summary of errors and warnings that were generated.
For further details of the list file format, see the IAR Assembler User Guide.
Analyzing the calling convention using C-SPY
1
Start C-SPY to execute the MixingCandAsm application.
2
In Fibonacci.c, position your cursor in the fib = GetFib(callCount); statement and choose Debug>Run to Cursor (alternatively, click the button ).
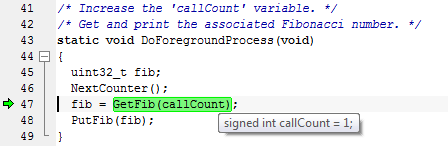
Hover with the mouse pointer over CallCount to see its value.
3
Choose C/C++ Development Guide (or C/C++ Compiler User Guide, depending on your product) from the Help menu.
In the PDF’s Bookmarks pane, navigate to Part 1, Assembler language interface, Calling convention, and click on Function entrance. Under the heading Register parameters, notice which registers that are used for parameters.
4
In C-SPY, choose View>Disassembly and View>Registers to open these windows.
In the Disassembly window, notice the use of registers in the instructions leading up to the subroutine call.
5
Click the Step Into button (). Notice how the editor window now displays the assembler source code.
6
In the Registers window, notice how the used register(s) have been updated accordingly.
Exit the debugger when you are done.