Simulating serial port input
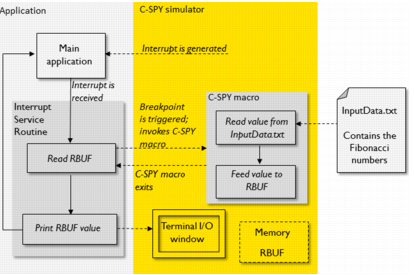
This tutorial shows how you can simulate input to a serial port data buffer (typically, some sort of a UART) and how to print the characters to stdout, all without using any actual hardware. Instead, the tutorial uses various mechanisms in the IAR C-SPY® Simulator, such as interrupt simulation, conditional breakpoints, C-SPY macros, and the Terminal I/O window. Note that this tutorial does not describe an exact simulation of true hardware execution; the purpose is to illustrate how these mechanisms can be useful to simulate hardware.
Note that the screenshots in this tutorial do not always correspond exactly to the counterparts in your product.
This tutorial assumes that you are familiar with basic use of IAR Embedded Workbench, see the tutorials Getting Started using IAR Embedded Workbench.
Tutorial overview
Tutorial description
Many microcontrollers have some sort of an integrated UART. Typically, when the UART receives a character, an interrupt is generated, and an interrupt service routine is called which reads the UART’s receive buffer and then, for example, prints the character to stdout.
Use the C-SPY debugger to simulate this behavior without using any real hardware:
*
*
*
*
*
*
The tutorial also guides you through the steps involved to achieve the required behavior:
*
*
The tutorial shows how you can do this by using a specific C-SPY system macro function.
*
The tutorial shows both how you can set up the breakpoint interactively—by using a dialog box—and how you can automate it by using a specific C-SPY system macro function.
*
Define the Access macro so that it reads a value from the InputData.txt file and feeds that value to RBUF.
InputData.txt contains the Fibonacci sequence, which is used for simulating the input to the serial port.
*
*
Files used in this tutorial
The project used in this tutorial contains these files:
*
Contains the main application and an interrupt service routine which reads values from a simulated serial port. When a value is received, it will be printed. While waiting for an interrupt, the main application prints periods (.).
*
Contains utility routines required by SerialPortInterrupt.c for the Fibonacci calculations.
*
Contains required definitions and declarations.
*
Contains the Fibonacci sequence.
*
A C-SPY macro file which reads a value from InputData.txt and feeds that value to RBUF, sets up the simulation of interrupts, and sets up the breakpoint conditions.
Opening the tutorial workspace
1
2
Click the Product explorer symbol.
3
Under the Advanced Debugging heading, click Open tutorial workspace. Choose a destination for your project in the browse dialog box that appears. We recommend that you create a specific directory (with a subdirectory) where you store all your tutorial files, if not already done. In this tutorial we call the directory MyTutorials and the subdirectory AdvancedDebugging.
After you have chosen a destination directory, the AdvancedDebugging workspace is opened in the IDE.
4
In the Workspace window, select the SimulatingSerialPortInput project, right-click and choose Set as Active.
Setting up and performing the simulation
In this example procedure, you will work through these steps:
*
*
*
*
*
*
Writing an interrupt service routine
This procedure demonstrates how you can use features in the compiler to write an interrupt service routine in C.
1
#pragma language=extended
 
/* Defines an interrupt service routine. */
#pragma vector=UART_VECTOR
__interrupt void UartReceiveHandler(void)
The #pragma language directive enables the language extensions used in the file:
*
_ _enable_interrupt enables interrupts.
*
#pragma vector specifies the interrupt vector—in this case the interrupt vector for the receive data buffer interrupt. In this tutorial, the interrupt vector UART_VECTOR is a symbolic name. In practice, you must instead use a name that is suitable for your device. For information about exactly which vector to use, see the SerialPortInterrupt.c file in the tutorial project.
*
_ _interrupt directs the compiler to use the calling convention needed for an interrupt function.
For more information about the extended keywords and pragma directives used in this tutorial, see the IAR C/C++ Compiler User Guide.
Setting up the project
The SimulatingSerialPortInput project is preconfigured with appropriate option settings for this tutorial. Still, this procedure guides you through the option settings required for this tutorial.
1
In the Workspace window, select the SimulatingSerialPortInput project, right-click, and choose Options.
2
Select the General Options category and on the Target page, select a device. For this tutorial, make sure to use the device specified in the header of the SerialPortInterrupt.c file.
A suitable device description file will automatically be used later on when you start the C-SPY debugger. This file contains device-specific information required by the C-SPY debugger to simulate, for example the interrupt used in this tutorial.
3
For the C/C++ Compiler and Linker categories, the default settings can be used.
4
To set debugger options, select the Debugger category, and click the Setup tab.
Verify these settings:
 
For more information about argument variables, see the IDE Project Management and Building Guide.
5
Click OK when finished making your settings.
Setting up the simulation using C-SPY macros
C-SPY macros are useful for many things, for example if you want to set up various kinds of intentional side effects during debugging.
This example procedure shows how you can:
*
*
*
*
The macro file SetupSimulation.mac is used in this procedure.
1
C-SPY provides a number of setup macro functions, which can be used for controlling when a macro should be executed. In this tutorial, the setup macro function execUserSetup is defined, which is automatically executed during C-SPY setup. Thus, it can be used to set up the simulation environment automatically, for example like this:
execUserSetup()
{
_ _message "execUserSetup() called\n";
 
_fileHandle = _ _openFile(
"$PROJ_DIR$\\InputData.txt", "r" );
if( !_fileHandle )
{
_ _message "could not open file" ;
}
}
In this example:
*
A message is printed in the Debug Log window to confirm that this macro has been executed.
*
The file InputData.txt is opened.
2
After that, the macro function Access is defined. It will read a Fibonacci value from the file InputData.txt, and assign the value to the receive data register RBUF:
Access()
{
_ _message "Access() called\n";
_ _var _fibValue;
if( 0 == __readFile( _fileHandle, &_fibValue ) )
{
RBUF = _fibValue;
}
}
Note:  
In this tutorial, the receive data register RBUF is a symbolic name. In practice, you must instead use a name that is suitable for your device. For information about which register to use, see the header in SerialPortInterrupt.c.
At a later stage in this tutorial you will connect this macro function to a breakpoint.
3
The C-SPY system macro _ _orderInterrupt is used for controlling the interrupt simulation:
_interruptID = __orderInterrupt( "UART_VECTOR", 4000,
2000, 0, 1, 0, 100 );
if( -1 == _interruptID )
{
_ _message "ERROR: failed to set up the interrupt";
}
Later on during execution, after each completed simulation of a single assembler instruction, the C-SPY debugger will check whether the activation time has been reached. If so, the interrupt will be triggered and set to pending provided that probability is set to 100% (as in this example). Because the interrupt has an infinite hold time, the interrupt stays pending until it is acknowledged. The interrupt service routine is then serviced.
Notice how this system macro takes the same parameters as can be specified using the Edit Interrupt dialog box.
4
The macro file SetupSimulation.mac also sets up the breakpoint conditions using the C-SPY system macro __setSimBreak. However, as you can see in the file, this function is initially not used because of the comment characters. Instead, you will set up the breakpoint later on in this tutorial using a dedicated dialog box.
5
Finally, the SetupSimulation.mac file contains two macro functions for managing correct file handling at reset and exit.
For more information about C-SPY macros, see the C-SPY® Debugging Guide.
Building the project
1
Click the Download and Debug button (). This command compiles and links those files that have been modified (if there are any such files), starts C-SPY, and executes the SimulatingSerialPort project.
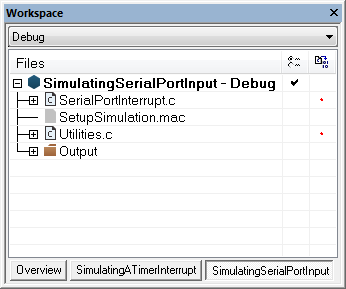
The editor window for SerialPortInterrupt.c is displayed (among other windows). Click in the window to make it active.
2
Examine the Debug Log window. Notice that the macro file has been loaded and that the execUserSetup function has been called and that your defined interrupt has been registered.
Setting a breakpoint on the receive register
By connecting a C-SPY macro that performs a certain task to an immediate breakpoint, you can simulate the behavior of a hardware device, for example a serial port, as in this tutorial. The immediate breakpoint is a specific breakpoint type which will not halt the execution, only temporarily suspend it to check the condition and execute any connected C-SPY macro.
In this procedure, the input to the serial port is simulated by setting an immediate read breakpoint on RBUF and connecting the C-SPY macro Access to the breakpoint which reads a character in a file and feeds that character to the serial port.
This procedure shows how you can do this using a dedicated dialog box, as well as how to use the corresponding C-SPY system macro _ _setSimBreak. The advantages of using C-SPY macros instead of the dialog boxes are, for example, if you want to automate your test procedure using C-SPY in batch mode (cpybat.exe) or if you want to share the settings with your colleagues.
1
Choose View>Breakpoints to open the Breakpoints window and right-click in the window to open the context menu.
Choose New Breakpoint>Immediate to open the breakpoints dialog box:
Add these parameters for your breakpoint:
 
Check SerialPortInterrupt.c for information about which receive data register to use.
During execution, when C-SPY detects a read access from the RBUF register, C-SPY will temporarily suspend the application and execute the Access macro. The macro will read a value from the file InputData.txt and write it to RBUF. C-SPY will then resume the application execution, which will read the value in RBUF.
2
Click OK to close the breakpoint dialog box.
3
Alternatively, if you instead want to set up the breakpoint using the C-SPY system macro _ _setSimBreak in the same way, remove the comment characters for:
_breakID = _ _setSimBreak( "RBUF", "R", "Access()" );
In this case, to make the change take affect and to execute the C-SPY macro, choose View>Macro>Macro Quicklaunch. In the <click to add> cell, type SimulationSetup() and click the Recalculate button ().
The macro has been executed and the breakpoint has been set. Click the Reset button () to reset the application.
Executing the application—performing the simulation
1
In the editor window for SerialPortInterrupt.c, step through the application and stop when it reaches the while loop, where the application waits for an input.
2
In the SerialPortInterrupt.c file, locate the function UartReceiveHandler.
3
Click in the margin of the statement ++callCount; to set a breakpoint.
If you want to inspect the details of the breakpoint, choose View>Breakpoints.
4
Open the Terminal I/O window and execute your application by clicking the Go button ().
The application should stop in the interrupt service routine.
5
To inspect the contents of the receive data register RBUF, choose View>Registers to open a Registers window.
Click <find registers>, specify the receive register you are using, and press Enter:
6
Click the Go button (
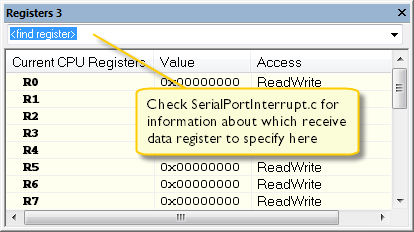
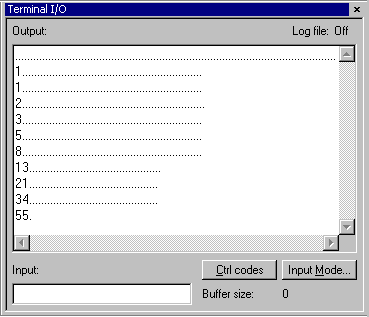
) to execute your application. The application should stop in the interrupt function. Notice how the contents of the receive register has been updated as expected.
7
Click Go again to see the next number being printed in the Terminal I/O window.
The Terminal I/O window displays the Fibonacci sequence.